The Complete Guide to Selling Tickets on Venga
Written by Alec Palmroos
Sell tickets, manage guests and check people in, all in one place. Everything you need to bring people together, from the first invitation to the final check-in.
Great events are about bringing people together. From intimate dinners and community gatherings to concerts, club nights and large-scale parties, Venga helps organizers turn ideas into experiences worth showing up for.
And when an event requires tickets, managing them should be just as simple.
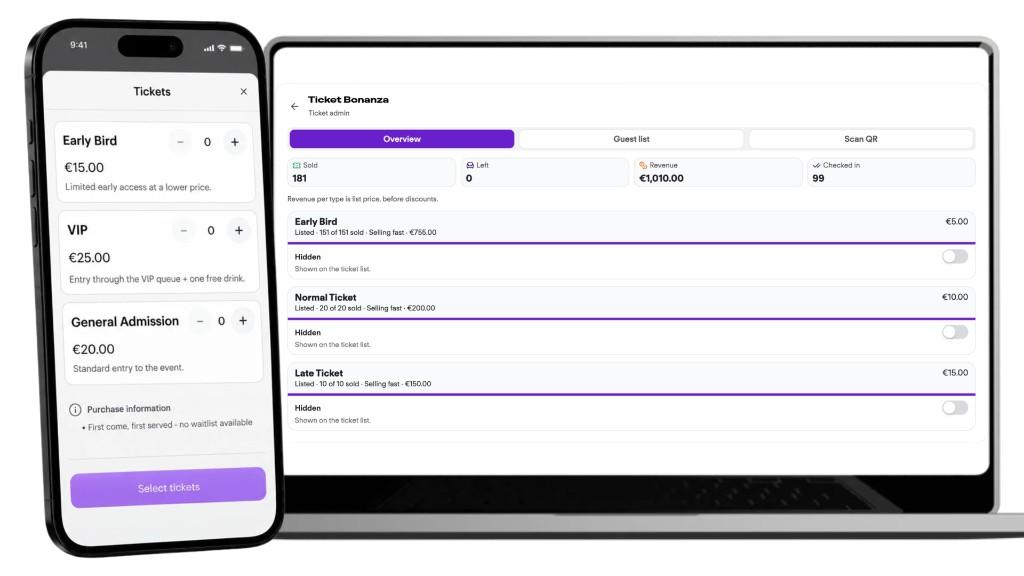
With ticketing built directly into Venga, you can sell tickets, manage your guest list, communicate with attendees and handle check-in without switching between different platforms.
We've partnered with Stripe to provide secure and reliable online payments, making the entire ticket purchasing experience smooth for both organizers and guests.
Everything you need to sell tickets and manage your event
From setting up your first ticket to collecting your revenue, here's everything you need to know about selling tickets on Venga.
With Venga, you can:
- Sell tickets online with secure payments powered by Stripe.
- Create multiple ticket types, such as Early Bird, General Admission and VIP.
- Create hidden tickets accessible through unique passwords.
- Check in guests with QR codes using the Venga app or your phone's camera.
- Give your team access to help manage tickets and check-in.
- Track ticket sales and attendance in real time.
Everything works together in one place, so you can spend less time managing logistics and more time creating a great event.
1. Getting started
Getting started takes just a few steps.
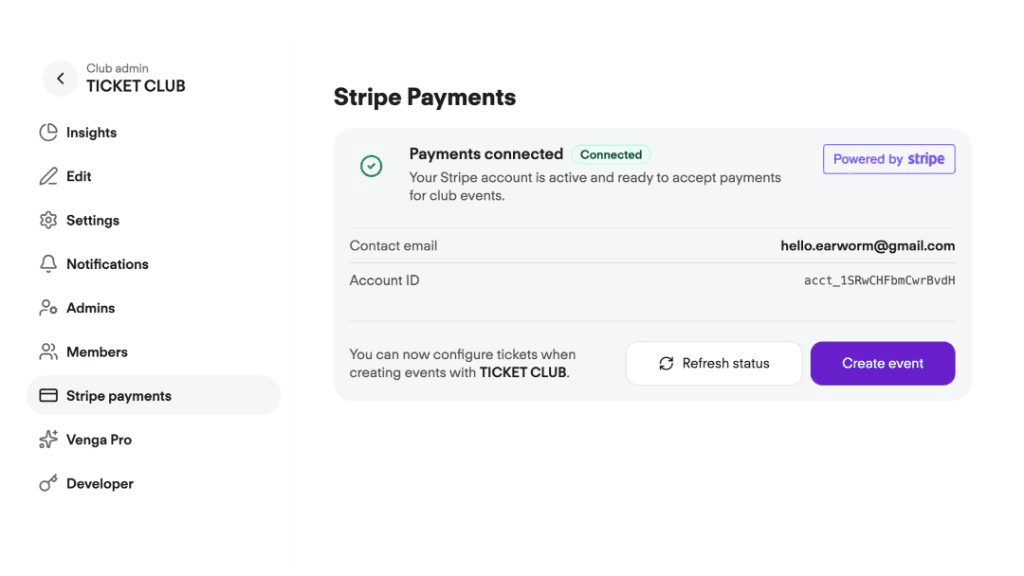
First, create a club page for your organization. This is where you'll manage your events, members and ticket sales.
Once your club is created:
- Open your Club Settings.
- Select Stripe Payments.
- Create a new Stripe account or connect an existing one.
- Follow the instructions to complete the setup.
This setup typically takes around 10 minutes. Once Stripe is connected, you're ready to create your first ticketed event.
Create your tickets
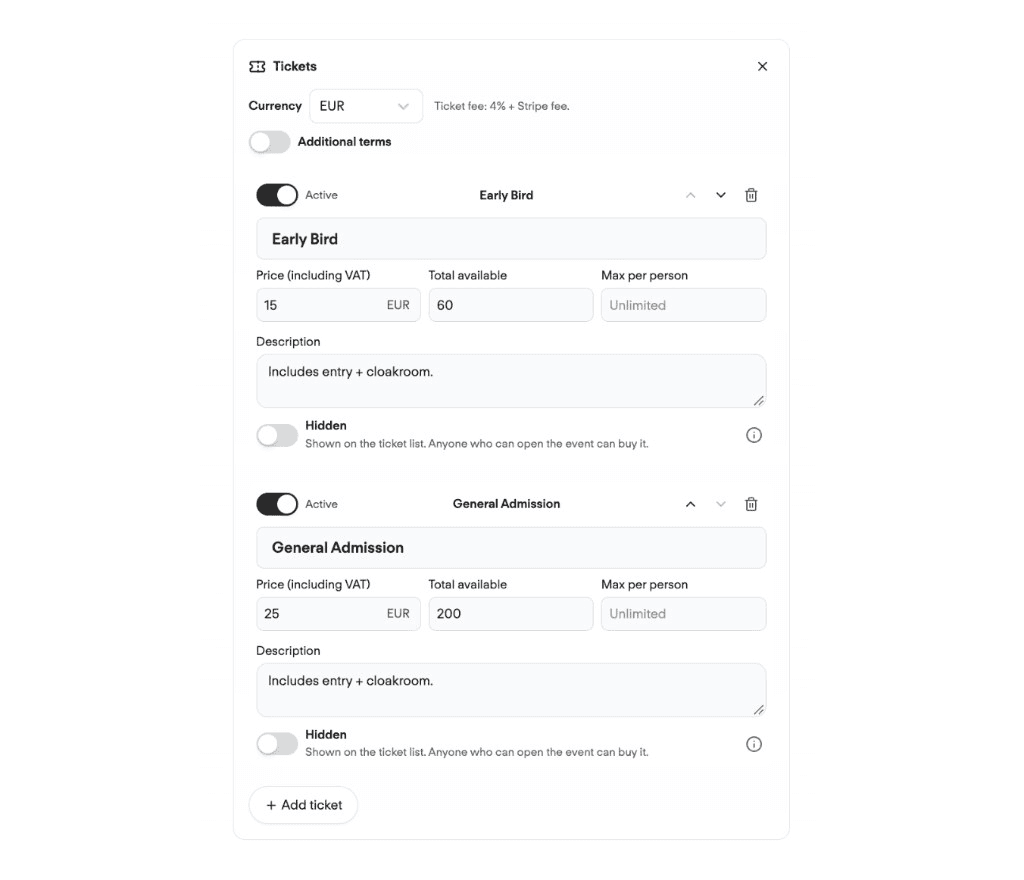
When creating an event, select Tickets to set up your ticket sales.
Here, you can:
- Create different ticket types, such as Early Bird, General Admission or VIP.
- Set the price for each ticket type.
- Choose how many tickets are available.
- Configure different ticket options for your event.
When everything is ready, hit Save and share your event link.
Guests can purchase tickets directly in their browser without downloading an app. After purchasing, they'll receive their digital tickets and QR codes by email.
2. Manage ticket sales with Ticket Admin
Once your event is live and ticket sales start coming in, you can manage everything from the Ticket Admin portal on your event page. Only you and authorized members of your organizing team can access it.
Track your sales in real time
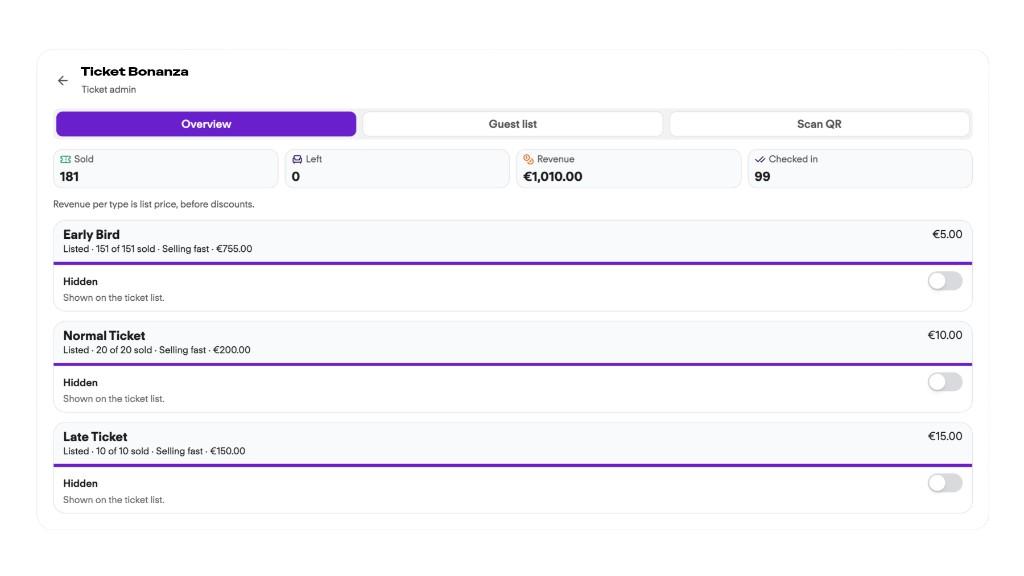
The Ticket Admin portal gives you an overview of how your event is performing.
You can see:
- Tickets sold: How many tickets have been purchased.
- Total revenue: The value of your ticket sales.
- Capacity: How many tickets are available and how many have been sold.
- Purchaser information: Who purchased tickets and how many they bought.
This makes it easy to follow sales and plan accordingly as your event approaches.
Update tickets whenever you need to
Need to release another batch of tickets or adjust your prices?
You can make changes directly on your event page.
- Add more tickets.
- Activate or deactivate ticket types.
- Increase or decrease ticket prices.
- Adjust ticket availability.
Your changes are reflected on the event page, so guests always see the latest ticket options.
3. Check in guests with QR codes
It's event day, and guests are starting to arrive.
With Venga, you can check people in by scanning their QR codes or finding them manually on the guest list.
How to check in guests
- Open your event in the Venga app and tap Ticket Admin.
- Select Scan QR to scan guests' tickets as they arrive.
- Alternatively, open the Guest List in Ticket Admin to find guests by name and check them in manually.
Guests can access their QR codes through their ticket confirmation email or under My Tickets on the event page.
Have multiple people helping with check-in?
If you're organizing a larger event, you can give your team access to help manage entry.
Simply add them as co-admins of your club through Club Settings.
They'll be able to access Ticket Admin, the guest list and the QR scanner, making it easy to coordinate check-in across multiple entrances or staff members.
4. Receive payouts through Stripe
All ticket payments are processed through Stripe.
To manage your payouts, log in to your Stripe Dashboard.
Depending on your Stripe account settings and eligibility, you can receive payouts automatically or initiate manual payouts to your connected bank account.
You can also view your payment history and payout status directly in Stripe.
For more information, see Stripe's guide to payouts.
5. Issue refunds
Need to refund a ticket purchase?
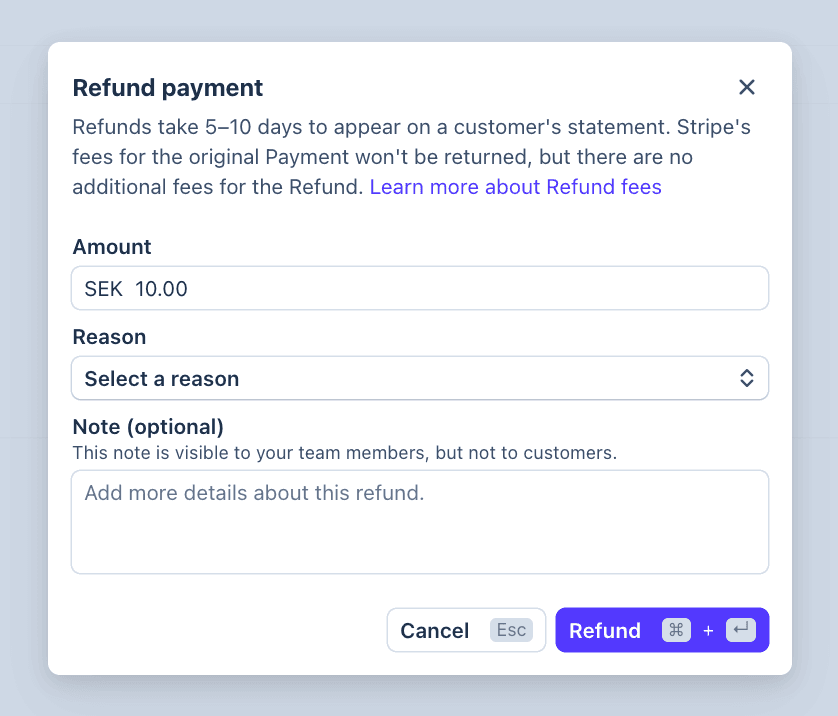
Refunds can be managed directly through your Stripe Dashboard.
Here's how:
- Log in to your Stripe Dashboard.
- Navigate to Transactions.
- Find and open the payment you want to refund.
- Select Refund.
- Choose whether to issue a full or partial refund and confirm.
Stripe will process the refund according to its payment processing timelines.
6. Create discount codes
Want to offer a special price to your community, reward early supporters or give selected guests a discount?
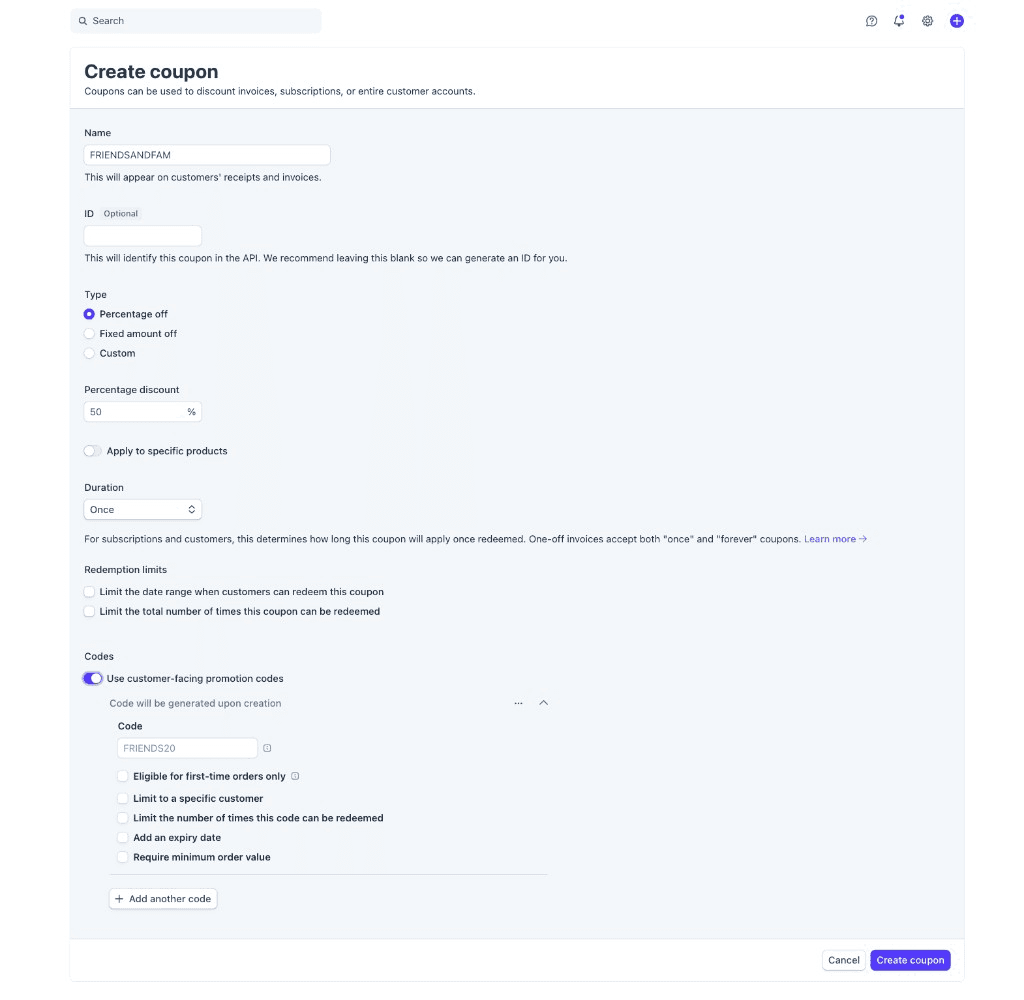
You can create discount codes through Stripe.
- Log in to your Stripe Dashboard.
- Navigate to Coupons.
- Select Add Coupon.
- Choose between a percentage discount, such as 50% off, or a fixed-amount discount, such as €10 off.
- Create your coupon and configure the discount details.
Once configured for your ticket sales, you can share the discount code with your guests.
Discount codes can be useful for early supporters, community members, partners or special promotions.
7. Create hidden tickets with passwords
Not every ticket needs to be available to everyone.
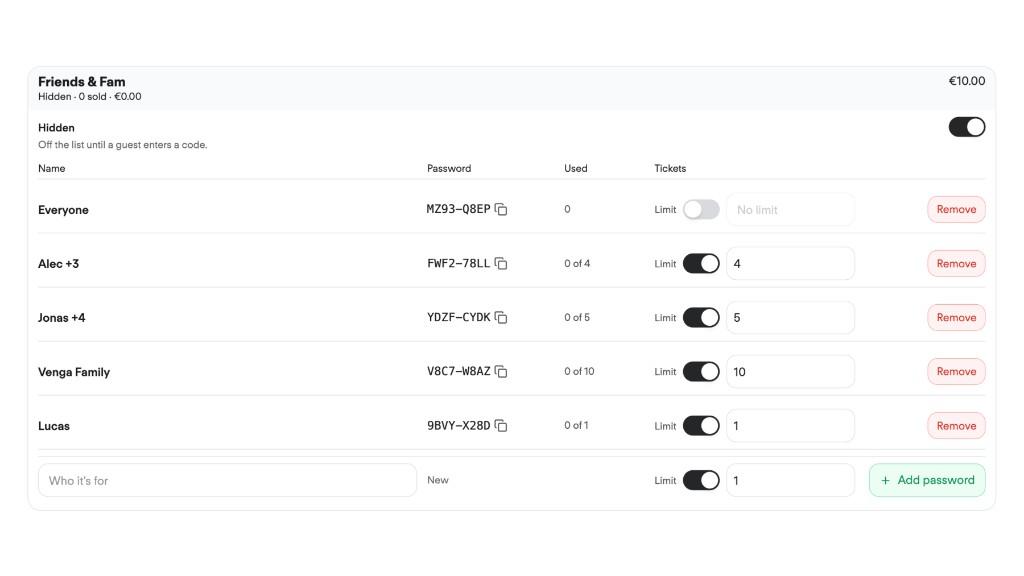
With Venga, you can create hidden ticket types that are only accessible to guests with a password.
This is particularly useful for:
- VIP tickets.
- Friends and family allocations.
- Partner or sponsor tickets.
- Exclusive presales.
- Invitation-only guest groups.
How to create hidden tickets
- Open your event and create a new ticket type.
- Enable the Hidden option.
- Save your ticket type.
- Open Ticket Admin.
- Create the passwords you want to use.
- Set how many tickets are available through each password.
You can then share the passwords with the guests who should have access.
This allows you to offer different ticket allocations without making every ticket type publicly available on the event page.
Pricing
Whether you're organizing a small community event or selling hundreds of tickets for a larger event, Venga offers flexible pricing to suit your needs.
You can start selling tickets with Venga's Free plan or upgrade to Venga Pro for lower ticketing fees and additional benefits.
Want to see which plan works best for your events?
We're here to help
Whether you're setting up your first ticketed event or preparing for a larger production, we're here to help you get started.
If you run into any issues or have questions about ticket sales, Stripe, guest management or check-in, feel free to reach out.
Email us at support@venga.app or send us a DM on Instagram at @vengamoments.
We'll be happy to help.
Ready to get started?